Identification and Diagnosis of Occlusal Disease
Part 1: The Role of Occlusal Screening in Improving Patient Care
Occlusion plays a part in almost everything we do in dentistry, from the simplest filling to the most complex orthodontics, yet this important aspect of dental health is often ignored.
The principal reasons for this are that:
A) Humans (along with most mammals) adapt surprisingly well, most of the time, to even quite major occlusal discrepancies. It’s important that we do, of course, or our species may not have survived too long. So, most of the time, we dentists can get away with not paying much attention to this area, knowing the patient will adapt to most things we do to them, or so we would like to believe.
B) Occlusal problems can be responsible for a wide range of symptoms and adaptations, many of which may not appear to be directly linked to “the bite”.
C) The connection between this wide range of symptoms and the way teeth contact is rarely made by our patients, and this relationship can sometimes be poorly understood by their dentists too so an opportunity to provide help is often missed.
D) Occlusal problems tend to be mostly chronic in nature, developing and worsening over time, so they may be difficult to diagnose or not brought to the attention of dentists, particularly if patients assume that their symptoms cannot be treated.
It is the wide range of responses to the same stimulus or stressor that can be confusing for dentists and patients alike, but in other fields it is recognised that stresses applied to any system will tend to affect the weakest link first.
Physical stress from a parafunctional habit (e.g. bruxism or clenching) will have a direct effect on
A) the muscles of mastication, head posture and facial expression
B) the temporomandibular and cervical joints
C) the dentition, both natural and prosthetic
D) periodontal structures.
The initial response of biological systems to a stressor is adaptation, but eventually physical stresses may reach a level where the body can no longer adapt and structures will begin to break down. In the case of excessive occlusal forces acting on the tissues (e.g. bruxism) this breakdown causes what we might then refer to as “occlusal disease”, which could be experienced as headaches (when muscles fail to adapt), TMJ clicking or locking (from ligaments that cannot cope), fractured and/or worn teeth (especially when compromised by environmental factors or large restorations) and localised periodontal breakdown (when the periodontal structures are the weakest link in the chain).
The biggest problem for dentists though is to recognise the point at which adaptation switches to breakdown so we can judge when it is appropriate to intervene and when it is safe to warn and observe. Part of this decision making process involves an understanding of the risk factors that may be present for each individual patient.
This is where a simple screening questionnaire can prove an invaluable tool. The SDS Occlusal Screening Questionnaire has been developed over many years in practices around the world and has proven very useful for course delegates. You can download it here: sdsosq
The Occlusal Screening Questionnaire may be used in many ways, but it is primarily intended to be completed by new patients prior to their initial examination. Many of our course delegates have also found it a good practice management exercise to encourage existing patients to fill in the questionnaire whilst at reception prior to routine examination appointments to screen for previously undiagnosed problems. It also has the positive effect of informing patients that we have an interest in their general health and of the potential link between teeth and headaches.
The first five questions all relate to the increased risk of occlusal disease caused by parafunction:
1) Do you clench or grind your teeth during the day?
2) Have you been made aware of clenching or grinding your teeth during the night?
Knowing about an awareness of clenching or bruxism is useful of course, but don’t be too surprised by a negative response here because even when we see the signs of a severe parafunctional habit we will often find that patients are unaware of their noxious habits.
3) Do you often wake up during the night?
4) Are your jaws or teeth tired when you wake in the morning?
5) Do you feel refreshed when you wake in the morning?
Disturbed sleep patterns and tiredness on waking could be related to clenching and bruxing, but these are also the early warning signs of other potentially serious conditions such as obstructive sleep apnoea (OSA) which would require a referral to the patient’s GP.
6) Do you suffer from chronic headaches or neck and shoulder pains?
This question relates to the muscles of mastication and head posture in particular. A positive response here would require further questioning during the examination (e.g. the location and time of day when these pains are experienced) and might indicate an occlusal imbalance that is causing hyperactivity in some of these muscles.
Disorders affecting the temporomandibular joints are covered by the next three questions:
7) Do you now, or have you ever had, pain in your jaw joint or the sides of your face, particularly around the ear?
8) Have your jaws ever clicked or popped when you open your mouth?
9) Have your jaws ever locked open or closed?
It’s important to understand the risk factors inherent in any treatment, but these are particularly important questions, not least from a medico-legal viewpoint as a failure to recognise or record a previous history of internal derangements can be the source of accusations that may be difficult to defend at a later stage.
Finally, we need to ask about any problems in function that patients may have noticed but fail to mention:
10) Do you tend to chew on only one side of your mouth?
11) Have you ever had any dental work (crowns, bridges, fillings etc.) that stopped your teeth biting normally together or felt “in the way”?
These questions might be a good way of opening a discussion with patients about the comfort and efficiency of their teeth, allowing the opportunity for us to discuss options that might help to improve matters.
In summary, using a simple Occlusal Screening Questionnaire like the one discussed here is an essential practice management tool that has many useful functions, but most importantly it helps us to improve the standard of care we offer our patients with minimal effort and cost.
Part 2: Parafunction – Don’t miss the signs that could ruin your day
A simple screening questionnaire to alert us to the possibility that our patients may have problems that could be related either to their occlusion or to a parafunctional habit such as clenching or grinding their teeth (bruxism) is a useful first step, but most of the time patients can’t tell us what we need to know because they adapt well and don’t notice much in the way of symptoms. They are usually blissfully unaware of their parafunctional habits until they are pointed out to them, and even then might vehemently deny that they are doing what the evidence shows they are doing. Some studies have shown that as many as 80% of our regular patients could exhibit some form of clenching or grinding habit at least some of the time.
Thankfully, because of adaptation, the vast majority of these people won’t need active intervention unless they reach a particularly stressful episode in the lives, or perhaps if they suffer from some kind of trauma to the head and neck such as a whiplash injury.
Accidents Waiting to Happen
Unfortunately for us as dentists though, the final straw that leads a patient into symptoms where none existed before can be what might appear to be relatively straightforward dentistry; a single restoration that doesn’t conform to the patient’s “normal” (i.e. worn in) occlusion that sends muscles into spasm; a difficult extraction or prolonged root-canal therapy that causes already stressed temporomandibular joints to seize up and become painful; a change in guidance on anterior teeth that restricts movement and leads to loss of restorations, mobility, sensitivity or fractures.
So, the trick is that we must be able to spot the “accidents waiting to happen” before they happen, then we must share our findings with the patient so that they are pre-warned of the problems you know might occur. It’s always worth remembering that if we tell our patients about a potential problem before it happens that’s a “reason”, but if we wait until after it has happened then the best we have got is an “excuse”.
Of course, once we have identified problems we can’t just ignore them but have to find a way to work that takes account of these potential difficulties. For now though, let’s just look at some of the things that we will probably have seen many times but may never have consciously noted – these are the signs that some kind of parafunction is either occurring now, or has happened in the past.
Signs of Parafunction
The first sign is something we should be able to spot as soon as the patient enters the room:
1. Masseter Hypertrophy – think David Coulthard; big square jaw, bulging cheek muscles that we can spot firing off as they get tense from across a room and a bull neck.
Invariably we will see this in powerfully built men, and before they even open their mouth we’re already expecting to see flat, worn teeth, even by the time they reach their late-20’s.
It’s unlikely these mega-healthy patients will get headaches, TMD or periodontal problems and they’ll invariably have absolutely no idea that they have the habit they most obviously DO have.
These are the patients where we need to monitor wear, assuming it hasn’t already gone too far, and find out if their gradually disappearing teeth worry them. They’re brilliant at fracturing teeth and pretty much anything else you put in their mouths – think chunky gold onlays rather than pretty porcelain fripperies if you want your work to last on these people!
So, now the patient’s in the chair and pretty much the first thing we see will be the tongue – catch it unawares and what do you see?
2. Tongue Scalloping – a surprisingly common finding but often difficult to see in some patients as you need to be quick to catch it in a relaxed state before the muscle tenses up and the scalloping, which is of course a reflection of the lingual and palatal aspects of the teeth, seems to disappear. Of course in severe cases you just can’t miss it, but the thing to be aware of is that if the shape of the tongue has changed we’re looking at a reasonably high level of clenching taking place over a fairly prolonged period.
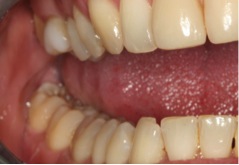
Fig 1. You have to be quick to spot tongue scalloping like this
Whenever we see tongue scalloping we can be fairly certain of seeing a matching pattern on the cheek mucosa, otherwise known as …
3. Cheek Lines – this is where chronic clenching and bruxism causes raised lines along the inside surfaces of the cheeks, invariably bilaterally. Sometimes this is caused by consistently holding the cheek mucosa between the teeth; we might even say the body is providing its own occlusal appliance in these cases.
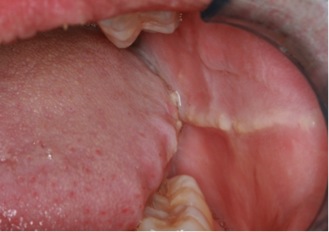
Fig. 2 – This combination of cheek lines and tongue scalloping is much easier to spot
Of course, the really obvious signs of parafunction we’re looking for will be on the teeth themselves, and top amongst the signs will be:
4. Tooth Surface Loss (TSL), or Wear – of course TSL is a very multi-factorial in aetiology, so it’s always going to be difficult to blame wear completely on parafunctional activity, but what we’re looking for in particular is what is commonly referred to as “key in lock” faceting. Patients are often amazed at the contortions required to find where the upper and lower teeth wear facets match together, but when they think about it this will often be a position they find naturally during sleep, particularly if they sleep face down on one side or the other.
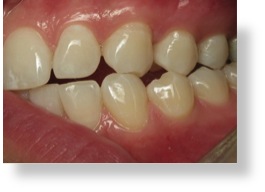
Fig. 3 – Worn canines are a sure sign of bruxism. This could be someone who sleeps on their right side.
Another aspect of TSL occurs around the gingival margins. This controversial lesion is often known as:
5. Abfraction – again known to be multi-factorial in origin, but despite the controversy I think we can now say with a high degree of certainty that these wedge-shaped lesions are intimately related to bruxism and clenching, almost certainly with the help of tooth-brush abrasion.
When we see an isolated tooth exhibiting this type of TSL, as in the following illustration, we know we must suspect an occlusal component in the aetiology.
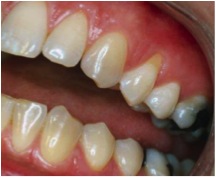
Fig. 4 – an isolated area of recession, along with the associated wear pattern, should sound alarm bells
6. Fractures in the floor of cavities – it might seem extreme, but nocturnal bruxism and clenching can impart huge forces (as much as 2,000 psi according to some studies) onto molar teeth, enough to quite literally crack them in half – when we see this sort of fracture occurring it really is important to investigate the way the opposing teeth contact, and whether there is an underlying parafunctional habit that might be able to be controlled.

Fig. 5 – cracks in cavity floor are not uncommon, but can you imagine the forces required to produce such damage?
Finally, something I’m sure we all see on a daily basis:
7. Bony buttressing and exostoses. The initial response of any biological system to increased stress is, of course, adaptation. In the case of muscle the muscle will bulk up and strengthen to cope with the additional stress, just like during weight training. Bone will have a similar response and the additional bone may result in buttressing (as in the illustration) and in those bony lumps we often see in lingual and palatal areas. Once again, when we see these changes it’s a fairly safe bet that we’re dealing with a patient with a parafunctional habit of some kind.

Fig. 6 – the body’s capacity for adaptation can be quite remarkable can’t it?
SUMMARY
So there we have it; parafunction has the potential to ruin your day, and your dentistry, but if it’s been going on for long enough it will always leave its mark. It might be the muscles, the soft tissues, the supporting tissues or the teeth themselves, but when we see any or all of the signs we have discussed it should be enough to give us, and our patients, pause for thought.
Part 3: The TMD Questionnaire
Once we have found a patient who has noticed symptoms that might indicate occlusal disease, and observed signs that confirm that there may well be a positive relationship between the way the teeth occlude and the symptoms the patient is experiencing, we are quite justified in carrying out a more detailed examination in order to reach a provisional diagnosis.
It is essential that we progress through a number of logical steps in the diagnostic process so that nothing is missed. The next step is to complete a specific TMD Questionnaire.

SDS TMD QUESTIONNAIRE
This can be a particularly important document because it comprehensively documents the baseline condition prior to any treatment, which has an important medico-legal role and allows meaningful comparisons to be made in the future.
1. Social and medical history
2. Primary complaint (scored from 0 – 10, 0 being not present, 10 being as bad it can possibly be)
3. Secondary complaint(s) (up to 3 or 4 is usually enough)
4. Symptoms:
a. Head Pain
b. Tooth Pain
c. TMJ Pain
d. TMJ Noises
e. TMJ Locking
f. Neck Pain
g. Shoulder Pain
h. Arm/hand Pain
i. Hand Numbness
j. Back Pain
k. Eye Pain
l. Sinus Pain
m.Ear Pain
n. Hearing Loss
o. Tinnitus
p. Dizziness
q. Sore Throat
r. Joint Pain Elsewhere, not TMJ
We need to record presence, frequency, time of day and location for each.
5. History of Trauma – we are particularly interested in whiplash, falls and blows to the head and neck here.
6. Current emotional stress level – this is useful because it can bring out important information the patient may not be happy to share with you unless you ask the question.
7. Signs of Parafunction are recorded, including location and intensity.
8. Muscle Palpation – here we record the presence of trigger points in the muscles of mastication and of head position. There are two primary reasons for doing this: pain referral patterns and to help understand the nature of any occlusal discrepancy or interferences. Specifically we test the following muscles, bilaterally, and record the severity of the tenderness between 0 and 3:
a. Trapezius Upper (Horizontal)
b. Trapezius Lower (Vertical)
c. Anterior Temporalis
d. Middle Temporalis
e. Posterior Temporalis
f. Masseter (superficial)
g. Masseter (deep)
h. Nuchal Line (insertion of Trapezius)
i. Sternocleidomastoid
j. Lateral Pterygoid
k. Medial Pterygoid
l. Coronoid (Ins Temporalis)
m. Digastric (Anterior Belly)
n. Mylohyoid
9. Temporomandibular Joint (TMJ) Signs:
a. External Tenderness
b. Tenderness in Ear Canal (closed)
c. Tenderness in Ear Canal (open)
d. Crepitus
e. Clicking or Popping
f. Pain on Full Opening
g. Deviation on Opening (Y/N/direction)
h. Deviation on Closing (Y/N/direction)
i. Maximum Opening (mm)
j. Left Lateral Excursion (mm)
k. Right Lateral Excursion (mm)
l. End Feel (hard/soft)
10. Occlusal Scheme:
a. Skeletal Classification
b. Occlusal Classification
c. Overjet
d. Overbite
e. First contact in retruded contact position (RCP)
f. Number of leaves on leaf gauge in RCP
g. Lateral interferences
h. Slide from RCP to MIP (vertical)
i. Slide from RCP to MIP (A-P horizontal)
j. Slide from RCP to MIP (Lateral horizontal)
You can download and save the pdf file here: SDS TMD Questionnaire – feel free to use this in your practice.
With all this background information in place it should be possible to determine a preliminary diagnosis and make well-informed decisions about what the next step should be. In some cases it may become clear that the occlusion plays little or no part in the symptoms, or it may be that the symptoms are not of sufficient severity for it to be worthwhile for the patient to invest in treatment at this stage. The appropriate action may then be to keep the patient under review until the situation worsens.
In many cases, however, the next phase will be to move the diagnostic process forward with a preliminary appliance and accurately mounted study casts before eventually formulating a long-term treatment plan.
Part 4: Provisional Diagnosis
Having collated and used this background information to arrive at a preliminary diagnosis, and, if we had significant evidence of an occlusal component to the patient’s complaint, then we would move into the next phase in the diagnostic process.
The next two steps are usually:
A) making a preliminary appliance (normally an anterior deprogrammer such as a Lucia Jig, NTI-tss, Prestige Bite-Stop, etc.) and
B) taking accurate study casts and mounting them, usually in centric relation (CR)
before eventually formulating a medium or long-term treatment plan.
There are some basic requirements for what are now collectively referred to as Anterior Mid-Point Stop Appliances (or AMPSAs), no matter whether they are maxillary or mandibular; pre-formed or laboratory made.
The appliance should fit snugly enough that it cannot move during contact with the opposing teeth, and nor should it be possible to accidentally deflect it from the teeth with the lips or tongue during sleep. This is essential to help prevent any risk of swallowing or inhaling the appliance, which can often be quite a small device.
The appliance should be adjusted in such a way that only the incisors of the opposing arch, and no other teeth, can make contact with the articular surface of the appliance. Specifically, no posterior teeth should be allowed to contact in any excursions, and the canines should, whenever possible, not contact during lateral movements.
When the incisors come into contact with the appliance this should be at an angle of 90 degrees, so that the forces of occlusion will be directed vertically, down the long axes of the teeth. Ideally no more than two incisors should touch the appliance at a time, although which teeth these are may vary depending upon the position of the jaw during excursive movements.
If we want our patient to have the best chance of complying with the chosen regime of wearing the appliance (say, night-time use) then it is essential to remove all extraneous material and polish any sharp edges. We so often see appliances that have not been worn purely because of these factors. The most common problem is a complaint that excessive bulk under the upper lip causes an inability to close the lips together and cause a dry mouth, something which can make the appliance intolerable for many patients.
We should always warn patients to watch out for certain signs and in particular they should be instructed to cease wearing the appliance immediately if they notice increased pain in either temporomandibular joint, or if it becomes loose.
Under normal circumstances the patient would ideally be reviewed after one or two weeks to determine what progress has been made. It should also be explained to the patient that there are three possible outcomes, all of which give useful diagnostic information:
1. Nothing has changed.
This would indicate that it’s unlikely that occlusion is playing any part in the symptoms. In a recent case I was asked to assess I found some minor symptoms had improved following AMPSA wear, but the primary pain had, if anything, worsened slightly, although it was not in the area of jaw joint. The explanation turned out to be a molar with a vertical crack running through the pulp. Extraction of this tooth led to complete resolution of the pain, but the complicating factor in the diagnosis was that it may well have been the obvious parafunction habits that had caused the crack initially.
2. There has been an improvement in symptoms.
This would indicate that the occlusion, or at least clenching or bruxism, may be playing some part in the symptoms and that, because the appliance helps to relax the muscles, it is more likely that the muscles are involved rather than the joints.
3. The problem has worsened and pain is more localised around the area in front of one or both ears.
This will generally indicate the presence of an internal derangement in the TMJ and the next step in the diagnostic process here would ideally be to refer for imaging (usually an MRI scan) to determine the level of damage and the position of the articular disc.
If outcome 2 has occurred then we need to move into the next stage of occlusal diagnosis and record centric relation (CR) and identify any differences between the first contact (or prematurity) in CR and the maximal intercuspal position (MIP).
Happily it will be much easier to determine CR accurately following a period of deprogramming, but it can be very difficult to see skids, slides and prematurities in the mouth, so this is where the use of accurately mounted study casts becomes an invaluable tool in understanding what is happening.
After a week or two of deprogramming we would review the patient and see what has changed. If we do find evidence to support our suspicion that occlusion may be playing some part in the patient’s condition then we need to properly analyse the occlusion with the help of articulated study casts, mounted in centric relation.
This should be second nature to most of us, of course, but experience has shown us that even the most highly trained dentists sometimes miss out this essential diagnostic tool, which also serves to help document the patient properly from a medico-legal viewpoint. As with written records, if there’s nothing there you didn’t do it, so if there’s the slightest suspicion that you may later need to make changes to the patient’s occlusal scheme it’s now vital to record the pre-treatment condition, including the centric relation position on that day. Even using supposedly “reversible” treatment like a stabilisation splint will often mean that you won’t be able to return to this pre-treatment position again later because this could result in internal changes within the temporomandibular joints, permanently altering the location of centric relation.
If we make accurate casts and mount them perfectly in centric relation then we will be able to recreate the first prematurity on the articulator in order to analyse the difference between the position and maximal Intercuspal position and its effect on the position of the condyles within the joints.
Accurately mounted study casts are also extremely useful for treatment planning in any case where there may be a requirement for some alteration in the occlusal scheme; from occlusal equilibration to a full-mouth reconstruction correct planning is the key to predictable success and stress-free dentistry. Accurate study casts mounted in centric relation are often an essential pre-requisite in the process, so let’s be careful not to miss an opportunity to take these records by blindly rushing into irreversible treatment with no road map.
To create the ideal mounted study casts we need to go through the following steps:
1. Accurate impressions for accurate casts
a. TRAY SELECTION
Carefully select metal impression trays that will allow the inclusion of every tooth in each arch, including the third molars if present, fully supported by the tray to prevent distortion. Disposable, plastic trays are not adequate, so using them is a false economy. A good set of stainless steel impression trays will be worth their weight in gold and can last a lifetime, just make sure you scribe your name on them before letting them go to the laboratory.
b. IMPRESSION MATERIAL
A good quality alginate will be perfectly adequate if it is going to be cast within a few hours. Anything that will take longer, or needs to be posted, must be taken in your usual crown and bridge impression material, e.g. a polyvinyl siloxane.
c. TECHNIQUE
Make sure every tooth is included in the impression, and take steps to completely eliminate air bubbles, especially on the occlusal surfaces. With alginate this can be achieved by smearing the occlusal surfaces with some material on a finger before placing the tray in the mouth; with crown and bridge material use a light body material over all the occlusal surfaces before placing the heavy body material in the mouth. Allow adequate time for setting according to the manufacturers’ instructions, and remove from the mouth carefully to avoid distortion.
d. LABORATORY
Your laboratory instructions should stipulate the use of hard (crown and bridge) stone for your study casts. It’s essential that we don’t get chips and wear on the casts when we’re assessing the occlusal contacts and simulating masticatory movements on the articulator later.
2. Recording Centric Relation
a. DEPROGRAMMING
Assuming we’re not taking a hinge axis location record at this point (because there’s really no need) we must record centric relation with some sort of deprogrammer which will allow the condyles to seat fully in the articular fossae, but we also need the teeth to be kept apart by the absolute minimum. There are a number of devices available to simplify this task, but the most commonly used is the Huffman Leaf Gauge. The patient is instructed to slide back and forth on the leaf gauge to deprogramme the jaw and is then guided back into centric relation. This is much easier after a period of wearing the Lucia Jig type of appliance for a week or two. We are looking for exactly the number of leaves between the anterior teeth that just prevent the posterior teeth touching. This may be as few as two leaves, but can be as many as 50 or more in extreme cases.
b. RECORDING MATERIAL
The material that we record the centric relation position in must be dead soft, set very hard and not distort. This completely rules out the use of wax, even Moyco Extra-Hard Beauty wax. There are many alternatives on the market these days, but our current favourite is FutarD.
c. TRIMMING THE RECORD
Before mounting the records should be trimmed to allow the casts to fully seat with no bounce or distortion. This invariably means trimming away any material that has been in contact with any soft tissues, and sometimes that which has extended into interproximal areas. It is also essential to check that the casts are fully seated by being able to visualise the cusp tips, so we would normally trim away the buccal excess to allow this area to be viewed directly.
3. Face Bow Record
a. CHOICE OF INSTRUMENT
We need to mount our records on a semi-adjustable articulator (e.g. Denar MkII) in order to analyse the occlusion, so we have to have some way of locating the casts within the articulator. All face bows involve some sort of average value compromise, but this is of minimal significance because we aren’t going to be changing the vertical dimension of occlusion as we recorded centric relation at the exact vertical we will use to make the assessment.
b. ESSENTIAL INFORMATION
The actual technique will vary according to the face-bow (or ear bow) being used, but it would be useful to be able to align the maxillary cast in a position that is as close to the patient’s true midline and horizontal relationship as possible. The face bow we have found the easiest to use in this regard in the Kois Dento-Facial Analyzer (available from Optident in the UK).
4. Cast Mounting and Verification
a. MOUNT THE MAXILLARY CAST
Using the appropriate technique for the articulator and face-bow the maxillary cast must be mounted using the correct articulating stone, mixed at precisely the correct proportions, in order to prevent distortion caused by expansion or contraction.
b. LOCATE MANDIBULAR CAST
The mandibular cast is then located in the occlusal registration and firmly attached to the maxillary cast using your preferred method. We tend to favour match-sticks and super-glue with rapid activator on our courses, but if you have a Bunsen readily available sticky wax is an option.
c. ZERO THE ARTICULATOR
Check that the incisal pin on the articulator is set to zero and that the posterior controls have been set to average values before applying the mounting stone. This should then be allowed to set for an appropriate period before removing the matchsticks and occlusal record.
d. VERIFY THE MOUNTING
Finally we have to verify that the first premature contact we noted in the patient’s mouth corresponds exactly to the first prematurity on the mounted study casts. If it does not this is an indication that an error has occurred during the process and it should be repeated.
We now have a properly articulated set of study casts that will help us properly diagnose the three-dimensional occlusal relationship that exists in the patient whose condition we are investigating. We have a pre-treatment record and we have an invaluable teaching aid for the patient.
Assuming we discover an occlusal discrepancy we can associate with the symptoms that patient is complaining of or the problems that need to be solved we would now move onto the final piece of the diagnostic jigsaw puzzle; the Stabilisation Splint.
Part 5: Stabilisation Splint
The Stabilisation Splint (SS) is a simple but effective tool for the diagnosis and management of complex cases that should be in the armamentarium of every dentist, whatever their discipline. The SS is multi-purpose, removable, hard acrylic splint worn over the entire upper or lower arch to provide a new, reversible, temporary occlusal scheme. The most important word there was “reversible” – in other words we can try out a new occlusal scheme, see if it helps or is acceptable and, if not, remove it or adjust it without having caused any unnecessary damage to the dentition and at minimal expense.
Whilst we tend to use the SS primarily as a diagnostic tool, because of its reversible nature, in some cases, having confirmed the diagnosis, the splint also may then become the definitive long-term treatment.
The principal indications for using a SS include:
a) confirming the relationship between signs and symptoms and the occlusion
b) symptomatic pain relief in cases of temporomandibular joint dysfunction (TMD)
c) alleviation of muscle spasm, pain, and neuromuscular disturbances that prevent a patient from arcing in the centric relation pathway of closure
d) establishing healthy supporting tissues and a centric relation occlusion prior to comprehensive restorative procedures
e) as a means of periodontal support.
Designed for each patient according to signs, symptoms, and individual occlusal requirements, the SS can be worn during sleep, at times of tension and/or stress, or whenever the patient feels the need for relief from discomfort. In the majority of cases we would default to using a mandibular appliance.
The main advantages of using the lower jaw are that mandibular stabilisation splints:
a) tend to be better tolerated
b) are more aesthetically pleasing
c) interfere less with the patient’s ability to speak
d) are easier to adjust and equilibrate
e) can also help to provide specific information regarding anterior guidance, centric relation occlusion, centric occlusion and “freedom in centric”
Using a SS Prior to Comprehensive Restorative Procedures:
As a diagnostic tool, the SS may be useful even when there are no underlying symptoms because they help the dentist to identify potential problems when it comes to making irreversible changes to the occlusion, e.g. with occlusal equilibration or restorative procedures, and to define them. The dentist is then better prepared to treat such disorders, if and when it becomes necessary. The appliance helps us to determine where the patient is comfortable, and once this is accomplished, the physiologic, neuromuscular, and psychological aspects of the problem can be identified and defined.
A typical case where we might want to do this is one where there is a significant discrepancy between the habitual bite (MIP) and centric relation (CR) that may be altered during restorative procedures that would be ordinarily be done as a reorganised approach, such as a quadrant of crowns or bridges. This happens because the habitual bite on that side is lost, the joint automatically seats and we then have no stable, reproducible position other than the most retruded position, which for some patients may be completely unsuitable.
Many of the most difficult and intractable cases of TMD that we see occur when dentists carry out extensive restorative dentistry but have have failed to recognise this problem and patients are left in terrible pain where previously that had managed perfectly well. Because using a SS will allow condylar repositioning we can use this to test that position. In the vast majority of cases this will help us to establish a reproducible centric relation position that will remain stable, a great advantage for the longevity and predictability of our restorative work, but it will also help us to recognise those patients for whom this could be a disaster, and plan a conformative approach that will prevent problems.
If the SS doesn’t work don’t expect an irreversible procedure to work any better.
This is a very important point. If discomfort cannot be corrected with acrylic, little success can be expected with occlusal equilibration, or restoring with metal or porcelain.
The SS might be the best medium- to long- term solution for some patients:
Some TMJ patients who may require comprehensive restorative procedures may be unable to progress immediately from the acrylic stage for financial, psychological, or other reasons. However, if they can obtain comfort and stability with this hard acrylic appliance then final treatment may happily be deferred until a later date. On a personal note I have only recently converted a patient into permanent bridges after a period of 17 years’ appliance wear; she used the lump sum from her pension entitlement.
Using the SS for Periodontal Support:
When periodontal disease has advanced to the point at which the teeth are mobile, the appliance serves to splint all the mandibular teeth, providing the patient with a solid base. A greater degree of stability can be easily obtained for the upper teeth, since the appliance can be designed to prevent their being intruded, deflected, moved, or rocked.
This enables the dentist to work on half the mouth at a time. Once the maxillary teeth are stabilised, the mobile mandibular teeth can be more easily adjusted to the more stable maxillary arch.
The acrylic around a very mobile or painful tooth can be hollowed (to be relined later), then the tooth can be left to heal with the appliance acting as a barrier to protect it from occlusal or tongue pressure. An upper-tooth problem is relieved by equilibrating the appliance.
How long a given patient will need the appliance will depend on comfort and the resolution of symptoms. If necessary, it can be worn for weeks or months. Rarely will negative changes occur, even if the appliance is worn for months.
Advantages of the SS:
1. Patient Acceptance:
Incidence of allergic reaction to acrylic is negligible, but must be considered.
Most patients easily adapt to wearing a mandibular appliance.
Patients may keep the appliance indefinitely and use it when needed.
Hard acrylic simulates the proprioceptive hardness of teeth, but it is soft enough to wear down during parafunctional activity, preventing wear on teeth.
The patient needs to feel a solid, tooth-like substance that will discourage bruxing. Using a soft material will often actively encourage parafunctional activity that can cause further damage to joints and muscles. Equally, if the appliance were unstable, or if the biting surfaces were not correctly adjusted, some patients could also continue to parafunction, and their symptoms might persist or worsen.
2. Ease of Fabrication:
The hard acrylic SS can be constructed, fitted and adjusted quickly and cheaply. Many dental laboratories, particularly orthodontic laboratories, can provide excellent appliances, constructed in clear, heat-cured acrylic, provided, of course, that we do our bit and send perfect impressions, a face bow and an accurate occlusal record.
3. Ease of Adjustment:
From time to time the occlusal surface of the appliance will wear, or the maxillary/mandibular relationship may change so the appliance needs adjusting to re-establish the correct occlusal relationship. Acrylic is, however, an easy material with which to work, so minor adjustments or resurfacing of the occlusal surface with a supplementary layer of cold-cure acrylic is generally all that is required. Equally, the internal fitting surfaces may also be relined with cold-cure if necessary.
When we might not use a lower SS:
1. Missing teeth in the upper arch.
We aim to adjust the splint to a point where we establish what is known as “neuro muscular release”. This is when the jaw becomes very relaxed and the teeth can be brought together from a distance without resistance. The more centric stops the easier it is to achieve this. Ideally we would want to establish four centric stops each side.
2. Class II Div I cases.
In cases where there is an increased Overjet it may be very difficult to establish the correct anterior guidance using a lower appliance due to the uncomfortable bulk of acrylic that might be needed, so an upper SS may often be the appliance of choice in these cases.
3. Missing canines.
Since we are interested in providing an idealised occlusion, which entails using canine guidance wherever possible, if the upper canines are missing we would make an upper appliance so the lower canines can engage upon it.
4. Mobile teeth.
In cases where there are mobile teeth the SS will invariably be made for the arch with the most mobile teeth present, which may be the upper arch.
In summary;
The stabilisation splint can be an invaluable tool in all aspects of dentistry when the diagnosis is unclear, when we need to re-establish healthy supporting structures and a stable occlusal relationship and when we need educate the patient about their condition.
There are only two reasons why stabilisation splints don’t work; a) the condition is not related to occlusion or b) the appliance isn’t correctly adjusted. We see numerous patients on referral where a SS has been made that hasn’t been successful; yet when the same appliance is correctly adjusted suddenly it works. These are skills that take training, time and experience to master, but they could be some of the most useful skills in dentistry because they help to produce happy, grateful patients and they make life easier, less stressful and more predictable.
Leave a comment

SDS Instructors

Roy Higson and Andy Lane

Great article Andy!